


Microcement kit for kitchen floors for 48 m² (absorbent surfaces)
Microcement kit for kitchen floors for 48 m² (absorbent surfaces)
Renovating a large kitchen can feel overwhelming… until you find the perfect DIY kit. If your kitchen floor is absorbent (cement, concrete, self-levelling compound…), this 48 m² microcement kit is your best ally for an epic, dust-free makeover.
Ready-to-use, eco-friendly and available in 20 irresistible colours. Apply it yourself and show off a seamless floor that changes everything.
Couldn't load pickup availability
* Our delivery times to the UK are two weeks (15 days) from the time the order is paid for. This period may vary depending on the customs clearance process. A process outside Smartcret's control. Our delivery times to the US are two weeks (15 days) from the time the order is paid for. (Air shipment to the US)
* The colours shown and their NCS equivalents are indicative and have no contractual value. Please note that the calibration of your monitor may influence the colour perception, so there is a chance that it may not match after applying the product. The lighting in the space the application method and the type of tools used may also affect the final result.
Share


Collapsible content
Description
Everything you need to renovate from scratch: what's inside the 48 m² microcement kit for absorbent kitchen floors
Got a spacious kitchen with an absorbent floor? Then this microcement kit was made for you. It’s a fully loaded set with everything you need to apply our DIY microcement on concrete, screed, plaster, self-levelling compound or drywall. Renovate without works, without dust, without complications. Just you, your drive, and a kit that’s all in.
Each product is designed to deliver a strong, seamless and stunning finish. Because when you’re tackling 48 m², there’s no room for guesswork. Here's what you'll find inside:
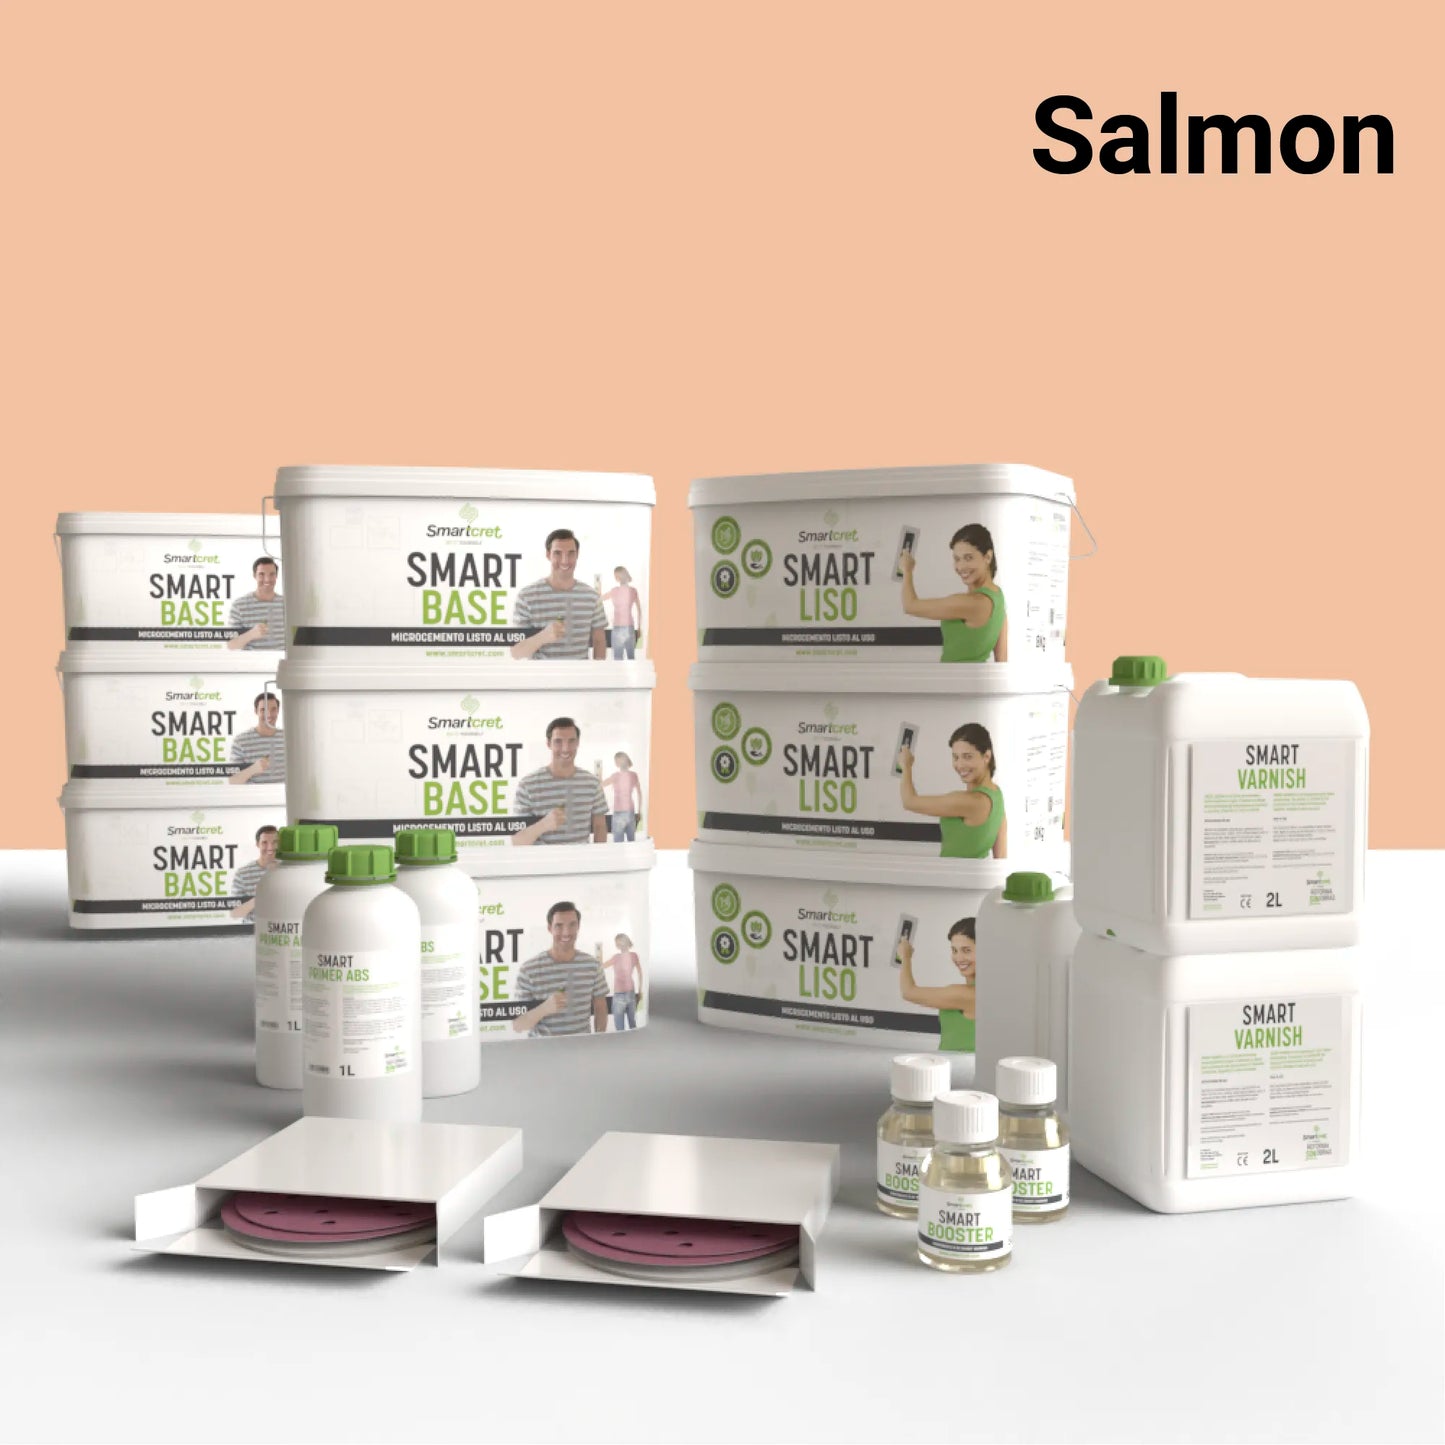
- 6 × Smart Primer ABS (1L): water-based primer for absorbent surfaces. Opens the pores and preps the base like a pro.
- 6 × Smart Base (16 Kg): pigmented base microcement. Builds body and creates a uniform surface.
- 3 × Smart Medio (16 Kg): ready-to-use finish microcement. Tougher, ideal for high-traffic floors.
- 2 × Smart Varnish (5L): water-based varnish that protects against stains, splashes and moisture. Available in matte or satin finish.
- 2 × Smart Booster (250 g): additive that enhances the chemical resistance of the varnish. A must-have.
- 36 × Grit 40 sandpapers: for smoothing Smart Base. First step to a flawless finish.
- 60 × Grit 80 sandpapers: for refining between Smart Medio coats. Gentle but effective.
- 36 × Grit 400 sandpapers: for perfecting between varnish coats. Because details matter.
And what about tools? They’re not included in this kit, but they’re key to nailing the result. We recommend getting our tool kit with burn-proof trowel, Smart Roller, masking tape, tray and more. Everything that makes the difference between a “not bad” and a “yep, I did that—and it’s amazing.”
Application
How to apply the microcement kit for absorbent kitchen floors – 48 m²: DIY without fear
Applying microcement on an absorbent surface isn’t hard—even if you're working with a big surface. Not when you’ve got the right kit… and you do.
So let go of doubt and fear. This 48 m² kit is made to cover cement, concrete, plaster or self-levelling floors without works, rubble or professional help.
The best part? It’s easy, fast and 100% DIY. Follow the steps and give your kitchen floor a smooth, durable and stylish makeover.
1. Prepare the surface
Make sure the kitchen floor is clean, dry and free of dust, grease or moisture. The base must be solid and in good condition—if not, you’ll need to repair it.
📌 Smartcret Tip: use masking tape to define the working areas. You’ll apply more precisely and stay mess-free.
2. Apply Smart Primer ABS
Using a roller, apply an even coat of Smart Primer ABS—specially formulated for absorbent surfaces like cement, plaster, drywall or self-levelling screed. Let it dry for about 30 minutes before moving on.
3. Build a solid base with Smart Base
Stir the product well and apply 2 thin coats of Smart Base (less than 1 mm per coat). Use the Smart Roller and smooth with the polycarbonate trowel held at a 45° angle. Let each coat dry for 6 hours and sand with grit 40. You’ll already start to see a real transformation.
4. Apply the finish with Smart Medio
Apply 2 thin coats of Smart Medio (max. 0.5 mm per coat) using the same technique: roller, trowel at 45°, 6 hours drying time and sand with grit 80 between coats. Your kitchen floor will start telling a whole new story.
5. Protect it with Smart Varnish + Smart Booster
Mix Smart Varnish with Smart Booster and apply 3 coats, letting each one dry for 4 hours. Sand the first and second coats with grit 400. After 7 days of curing, your new floor will be ready to shine—and stand up to daily wear.
🚨 Important: always keep the trowel at a 45° angle for an even finish. Use only the proper tools (like those in our specific tool kit). Sand manually to avoid damaging the microcement. If you use a power sander… be careful not to press too hard.
Technical Sheets
Technical data sheets for the 48 m² microcement kit for absorbent kitchen floors
Want to know exactly what’s inside this microcement kit? Here you’ll find the full technical data sheets for every product: composition, coverage, drying times and application tips.
Because when you know exactly what you’re working with, everything goes smoother. And when it comes to absorbent surfaces like concrete, self-levelling compounds, plaster or cement, having control is everything:
Specification sheet Smart Primer ABS
Specification sheet Smart Base