Includes Smart Base, Smart Liso, Smart Varnish, Smart Booster, Smart Jointer and Smart Primer PLUS, sanding discs and instructions · Free shipping, delivery time shown at checkout · 14-day returns
What arrives at your home7 products · 16.0 kg
That is 16.0 kg and the carrier leaves it at the street door, not inside your home. Have someone to help you carry it up.
Product
Qty
Format
Smart Base
1 ×
8 kg
Smart Liso
1 ×
3 kg
Smart Varnish
1 ×
1 L
Smart Booster
1 ×
50 g
Sanding discs
11 ×
g40 · g220 · g400
Smart Jointer
1 ×
1,5 kg
Smart Primer PLUS
1 ×
0,5 L
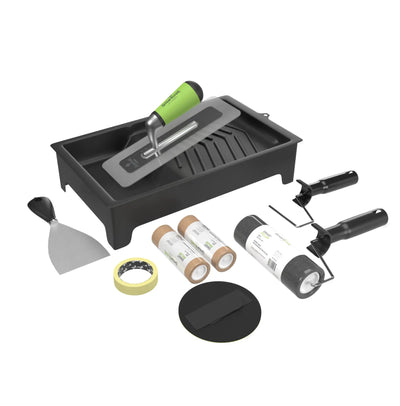
Tools are sold separately — trowel, roller and bucket.
See them →
✓ FREE shipping. Delivery times depend on your country; you will see the estimate at checkout.
One kit to clad facades, walls, low walls and porches over mortar, concrete, rendered brick or tile, without ripping anything out. Choose the surface, the size and the colour; the kit arrives complete, with instructions. The outdoor floor has a kit of its own.
Colour: swatches and NCS equivalences are indicative. The actual result may vary depending on your screen, the lighting of the space, the surface and the application.
Everything you need to know about microcement for outdoor walls before you start
Description
What it is
Microcement to clad the outdoor walls you already have: facades, walls, parapets and porches.
It goes on top of the existing surface in a thin layer, so there is no demolition and no rubble. You choose the surface you have and the kit adapts to it.
Twenty colours, all with a matt finish. The kit arrives complete and with step-by-step instructions.
It goes on top of what you already have, with no ripping out and no rubble. The kit includes all the products and step-by-step instructions; the tools (trowel, roller and tray) are sold separately. There are four products, always in this order:
Preparation. On mortar, concrete, rendered brick or block the surface is porous and there are no grout lines to fill: apply Smart Primer ABS, the primer for absorbent surfaces, and after 30 minutes you can carry on. On tile or mosaic the surface does not absorb: first fill and level the grout lines with Smart Jointer (12-24 hours of drying) and then apply Smart Primer PLUS, the maximum-adhesion primer (30 minutes). Do not apply in rain, in frost or in full summer sun: between 15 and 30 °C and with no strong wind.
Smart Base, two coats. This is the preparation layer: it is applied with a trowel in a thin layer, around 1 mm per coat, as thin and even as possible and well covered (it admits up to 1.5 mm, but thick coats are slow to dry and can unlevel the finish); left to dry for 4 to 8 hours between coats (6 hours as a reference) and sanded with the 40 grit disc. It is what gives the coating body and what makes Smart Liso grip.
Smart Liso, two coats. This is the finish: a very thin layer (less than 0.3 mm per coat), 4 to 8 hours of drying between coats (6 hours as a reference) and sanding with the 220 grit disc. The second coat is the one that sets the final look. The whole build-up comes to around 2-3 mm thick.
Smart Varnish, three coats. It is mixed with Smart Booster, stirred and applied 24 hours after the last coat of Smart Liso: three coats with a roller, 4 hours between them, sanding the first two with the 400 grit disc. The varnish is what protects and what gives the matt finish; you apply every coat, without skipping any.
Putting it to use. The wall stands up to rain 24 hours after the last coat of varnish and reaches maximum resistance after 7 days.
No previous experience is needed. The total time depends on the surface area and on the drying times between coats: the application takes three days and the varnish reaches full cure after seven.
Properties
Properties
Seamless and continuous. Applied in a thin layer over the existing surface, so it does not noticeably raise the level.
Twenty colours. All with a matt finish, which comes from the varnish included in the kit.
Ready-to-use. The microcement comes pre-mixed: no measuring out or mixing aggregates.
Reinforced varnish. Smart Varnish with Smart Booster: it is the layer that stands up to rain, sun and frost and the one that keeps the colour.
Adhesion on difficult surfaces. The primer is what lets you apply it over surfaces that do not absorb, such as tile or mosaic.
Cleans with water and mild soap. No abrasive products or metal scourers, which scratch the varnish.
Uses
Uses
Facade
Garden wall and low garden wall
Terrace or balcony parapet
Porch or veranda wall
The front of a built-in barbecue, on the outside
Additional information
Additional information
What arrives. Primer (Smart Primer ABS or, on tile, Smart Jointer and Smart Primer PLUS), Smart Base, Smart Liso, Smart Varnish with Smart Booster, 40, 220 and 400 grit sanding discs and step-by-step instructions. The tools (trowel, roller and tray) are sold separately, in the Smart Tools kit.
Coverage. Each size in the dropdown covers the area stated in its name, counting the two coats of Smart Base and the two of Smart Liso.
Storage. Keep unopened containers somewhere cool and frost-free.
Application conditions. Between 15 and 30 °C, with no rain forecast within 24 hours, no frost and no direct sun on the wall while you apply it.
What is not covered. Submerged surfaces or surfaces with permanent water, surfaces that flex (wood, sheet metal) and walls with unresolved rising damp.
The floor outside. For the terrace, the patio and the stairs there is the microcement kit for outdoor floors, with Smart Medio as the finish.
Technical data sheets
Technical data sheets for the products in the kit
These are the technical data sheets for every product in the kit. Which ones you receive depends on the surface you choose.
The kit includes every product of the Smartcret system your surface and square metres need: primer, Smart Base, the finishing microcement (Smart Liso for walls and furniture, Smart Medio for floors), the Smart Varnish sealer and the sanding discs, with step-by-step instructions. You have them listed one by one, with quantities, in the “What arrives at your home” block, below the buy button, which changes with the metres and the surface you choose. Tools (trowel, roller, tray and sanding glove) are sold separately: you have them all in the Smart Tools tool kit. The microcement comes ready to use and pigmented; in the bathroom, kitchen, floor, outdoor and furniture kits the varnish is mixed with Smart Booster, which is included; for walls and fireplaces the varnish is used on its own.
Which m² kit do I need?
Measure the surface to be covered: for walls, width × height of each section; for floors, worktops or furniture, length × width of each face. Subtract only large openings and add up the total. Choose the kit whose m² is equal to or greater than that total; if in doubt between two, go for the larger one.
Is it right for my surface?
Each kit is formulated for a specific project and surface: you will find it in the kit name and in the “Surface” option of the selector. If your surface is different (for example, plasterboard instead of tiles), choose it in the selector and the kit adjusts. If your project is another room, you have all eight kits in the kit collection. First repair any loose piece, active crack or damp problem.
Can I return or exchange the kit?
Yes: you have 14 days from delivery for exchanges and returns. Return shipping is at the customer’s expense and your order number is enough for us. See the full conditions.
Preguntas frecuentes sobre el microcemento en paredes de exterior
¿Se puede aplicar microcemento en una fachada?▼
Sí. Este kit reviste fachadas, muros y muretes de jardín, muretes de terraza o balcón, paredes de porche o galería y el frente exterior de una barbacoa de obra.
Va encima de lo que ya hay —mortero, hormigón, ladrillo enfoscado, bloque, azulejo o gresite— en 2-3 mm, sin picar y sin escombro. Veinte colores, todos mate.
¿Qué tiempo hace falta para aplicarlo fuera?▼
Entre 15 y 30 °C, sin lluvia, sin heladas y sin viento fuerte, y no a pleno sol de verano, porque el calor acelera el secado y dificulta el acabado.
Si la previsión no acompaña, es mejor esperar: la aplicación completa lleva unos tres días.
¿Cuándo aguanta la lluvia?▼
La pared aguanta la lluvia a las 24 horas de la última mano de barniz y alcanza sus máximas resistencias a los siete días.
El barniz se da entero —tres manos de Smart Varnish con Smart Booster— sin saltarse ninguna; es lo que protege el revestimiento y le da el acabado mate.
¿Vale sobre un murete o una fachada con azulejo o gresite?▼
Sí. Sobre azulejo o gresite el soporte no absorbe: primero se rellenan y nivelan las juntas con Smart Jointer y después se da Smart Primer PLUS, la imprimación de máxima adherencia; los dos vienen en el kit para azulejo.
Sobre mortero, hormigón o ladrillo enfoscado, que sí absorben, el kit trae Smart Primer ABS y no hay juntas que rellenar.
¿Qué diferencia hay con el kit de suelos de exterior?▼
El acabado. En paredes se usa Smart Liso, de textura fina; en suelos, Smart Medio, con más cuerpo, que es el más duro del sistema porque tiene que aguantar pisadas.
El suelo de la terraza o del porche lleva su propio kit de suelos de exterior; este es para lo vertical.
¿Sirve para una piscina o para una pared en contacto permanente con agua?▼
No. El microcemento Smartcret no está pensado para superficies sumergidas ni en contacto permanente con agua clorada, como el vaso de una piscina, ni para el borde o la coronación, donde el agua se encharca y se pisa mojado.
Para el murete de alrededor, que recibe salpicaduras y se seca, sí.